
DIY Plumbing | How To Stop A Running Toilet
February 12, 2019It’s the middle of the night and you can’t sleep, why? Because you can hear your toilet running. A running toilet is a common problem that many households will experience at some point or another. As frustrating as it may be you can resolve this issue with only a few inexpensive parts from your local hardware store and about 15-20 minutes of work. The ability to do it yourself will help you save water and in turn, save money.
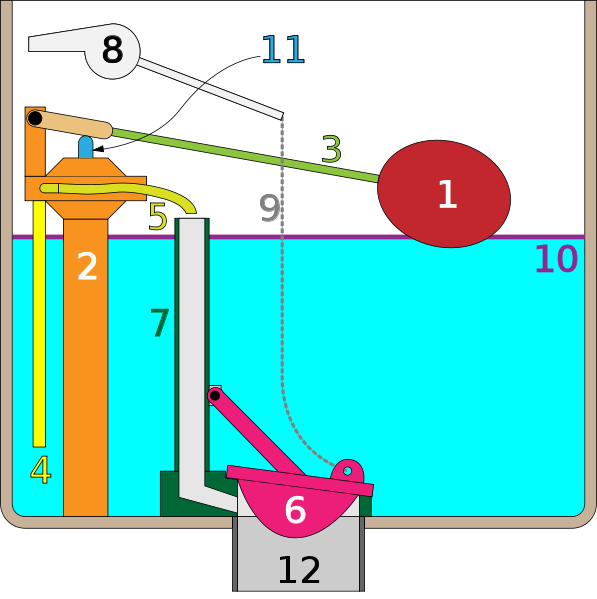
This image can help if you are not familiar with the parts inside of your toilet. We’ll be using the numbers on this chart later so that you can easily know what we’re talking about.
Inspect Your Fill Tube
The fill tube (number 5 on image) is responsible for spraying water down the overflow tube and refill the bowl after each flush. If the fill tube falls off it won’t make your toilet run constantly, but it will make your flushes much less powerful. Make sure the fill tube is firmly secured to the outlet on the fill valve and the overflow tube to avoid this.
Make Adjustments to Your Float Height
The float in our image above (number 1) is a ball type float. If your toilet has one of these you can set the water height by bending the rod up or down until it shuts off the fill valve at the correct water level. If your toilet has a circular, black, plastic part connected to the stem of the fill valve then there will be a clip and rod on the side that you use to adjust the water level. Now that you know where your float is and how to adjust look at the back wall of your toilet’s tank and find the required water fill line. Mark the level on the overflow tube with a permanent marker so that it easier to see and judge if the water level is correct. Make adjustments to the float until the water level fills to mark after each flush. It’s important to do this because if your float is set too high water will continually fill the tank, pour into the overflow tube, and into the bowl creating that dreaded running water noise.
Adjust Your Flapper Chain
If your flapper chain (number 9 on image) is too short or is tangled it will hold the flapper (number 6 on image) open and continually dump water into the tank. Make an adjustment to the flapper chain so that there is only slight slack when the handle is up. A chain that is too long could also be a problem because it won’t allow the flapper to open all the way and let the proper amount of water into the bowl.
Replace The Flapper
If you’ve tried all the steps above and your toilet is still running then your flapper (number 6 on image) is likely worn out. Be sure to shut off the water supply to your toilet and remove the flapper. Take note of the brand and model of your toilet before you go to a hardware store because many flappers will have specific compatible toilets listed on the package. If you are unable to find one that is listed as being compatible with the toilet in your home then look for a universal one that closely resembles the one that you pulled off your toilet. Flappers usually clip onto the base of your overflow tube or have a ring on the end them that slip over the top of the overflow tube.
Call Us If You Need Assistance
You may end up completing all of these solutions but your toilet could still be running or you may not feel comfortable attempting to do this yourself. Just know that you can always rely on professional help like ours at Pann Home Services & Remodeling to get the job done. Our company knows what it takes to get a quick solution done that your toilet may be facing. Call today to schedule an appointment in your home, we’ll get it repaired quick and easy.
Expert Tips from the Pros


Serving The Greater Cambridge and Boston Area
- Boston
- Back
- AC Repair
- Community
- Cooling
- Drain Cleaning
- Frozen Pipes
- Furnaces
- Handyman
- Heating
- Newsletter
- Plumbers
- Remodeling
- Sewer Camera Inspection
- South Boiler Repair
- South Heating
- South Sump Pumps
- South Tankless Water Heaters
- Spring A/C Services Boston
- Sump Pumps
- Tankless Water Heaters
- Water Heater Replacement
- Water Heaters
- Back
- AC Installation, MA
- AC Repair
- AC Repair
- Basement Remodeling
- Bathroom Remodeling
- Boiler Repair
- Carpentry And Remodeling
- Commercial Plumbing Services, MA
- Cooling
- Drain Cleaning
- Ductless Mini Splits
- Emergency Plumbing Services, MA
- Employment
- Frozen Pipes
- Furnaces
- HVAC
- HVAC Installation, MA
- HVAC Repair, MA
- Handyman
- Handyman
- Heat Pumps
- Heating
- Heating
- Heating And Furnaces
- Indoor Air Quality
- Kitchen Remodeling
- Leak Detection, MA
- Plumbers
- Plumbing Services, MA
- Residential Plumbing Services, MA
- Sewer Camera Inspection
- Sewer Line Repair, MA
- Sewer Repair
- Sewer Repair
- Sump Pump Installation, MA
- Sump Pump Repair, MA
- Sump Pumps
- Tankless Water Heater Installation, MA
- Tankless Water Heaters
- Tankless Water Heaters
- Water Filtration
- Water Heater Installation, MA
- Water Heaters
- Back
- Plumber
- Back
- AC Installation, MA
- Air Conditioning
- Carpentry And Remodeling
- Commercial Plumbing Services, MA
- Cooling
- Emergency Plumbing Services, MA
- Furnaces
- HVAC Repair, MA
- Handyman
- Heating
- Leak Detection, MA
- Plumber
- Plumbers
- Plumbing Services, MA
- Residential Plumbing Services, MA
- Tankless Water Heater Installation, MA
- Tankless Water Heaters
- Water Heater Installation, MA
- Water Heaters