
DIY Plumbing: How To Winterize Your Home
December 13, 2018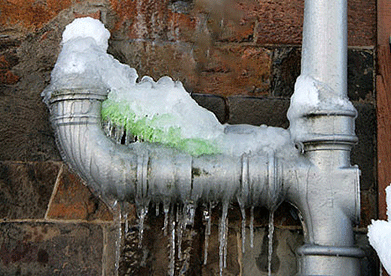
Most people believe that pipes burst at the freezing point of water but this is not actually true. The truth is that pipes burst somewhere between a closed facet, like a washing machine or kitchen faucet and the actual freeze. Pressure begins to build due to an ice blockage and it has no place to go but through the pipe walls. Having a pipe burst like this can cause serious water damage in your home. That is why our team of trusted plumbers recommend winterizing your home’s plumbing system and stop frozen pipes before it’s too late. Taking preventive care steps for home winterization can save you money down the road. This year our team of expert plumbers wants to give you an early holiday gift basket of five plumbing tips and tricks on how to winterize your home today.
1. Pipe Insulation
The pipes of your home are more likely to freeze when temperatures fall below 20 degrees Fahrenheit. A winterized house should have proper pipe insulation that provide the first line of protection against freezing temperatures and frozen pipes. If you happen to be residing in an area where these freezing temperatures are common, our plumbing specialists recommend that you take extra care when adding pipe insulation. For example in Massachusetts, the average low temperature is 22 degrees Fahrenheit starting in December and have been know to drop into the teens during January and Feburary. For the best possible pipe winterization, we recommend adding a thicker layer of insulation around your pipes.
For the best home winterization results, insulate the pipes of your home in all of the unheated areas. Pipes in areas that are unheated are more likely to freeze. Your local hardware store should have all the tools and insulation you will need to get the job done. Wrap the pipes with insulation tubes made out of polyethylene or fiberglass. Make sure to measure the diameter of your pipes to ensure that you buy the right tube size. Be extra cautious with pipes that have frozen during any past winters or have been recently repaired within the last 12 months because these pipes will be more susceptible to damage. Heat tape will provide an extra layer of protection when applied before the pipe insulation but make sure to follow the manufacturer’s instructions on how to apply the tape to avoid damage.
2. Keep a Dripping Faucet
Turn on faucets along the exterior walls to create a small and steady drip on nights that you know the temperature is expected to drop below freezing. The steady drip will eliminate any pressure that can build up between the ice blockage and your faucet inside of your winterized home. Even if the pipe freezes, this ensures that it will not burst.
3. Open Cabinets
Another way to stop frozen pipes from happening is introducing more heat. To do so open all sink based cabinet doors along the outside walls. This will allow more heat to reach the pipes. This is easy to complete and can prove to be very effective for home winterization.
4. Fix Exterior Cracks
Our plumbers recommend taking note of any cracks or holes along the exterior walls and foundation of your home while you are making the rounds for cold weather preparation. Filling cracks and holes with a spray foam insulation or caulking will help stop cold air from getting into contact with your water pipes during these extremely cold months.
5. Seal Off Crawl Space
Beam and Pier homes with a ventilated crawl space should be sealed against cold weather. We recommend that you cover your vents with heavy-duty board pieces cut to fit the vents and tape the cardboard in place. Don’t forget block off the entry to the crawl space. If your home has a basement, be on the look out for a cracked basement window that could allow cold air to come into contact with pipes. Also check for worn down or missing insulation around garage and utility doors. Decreasing the amount of cold air in your home reduces your pipes’ chances of freezing.
Expert Tips from the Pros


Serving The Greater Cambridge and Boston Area
- Boston
- Back
- AC Repair
- Community
- Cooling
- Drain Cleaning
- Frozen Pipes
- Furnaces
- Handyman
- Heating
- Newsletter
- Plumbers
- Remodeling
- Sewer Camera Inspection
- South Boiler Repair
- South Heating
- South Sump Pumps
- South Tankless Water Heaters
- Spring A/C Services Boston
- Sump Pumps
- Tankless Water Heaters
- Water Heater Replacement
- Water Heaters
- Back
- AC Installation, MA
- AC Repair
- AC Repair
- Basement Remodeling
- Bathroom Remodeling
- Boiler Repair
- Carpentry And Remodeling
- Commercial Plumbing Services, MA
- Cooling
- Drain Cleaning
- Ductless Mini Splits
- Emergency Plumbing Services, MA
- Employment
- Frozen Pipes
- Furnaces
- HVAC
- HVAC Installation, MA
- HVAC Repair, MA
- Handyman
- Handyman
- Heat Pumps
- Heating
- Heating
- Heating And Furnaces
- Indoor Air Quality
- Kitchen Remodeling
- Leak Detection, MA
- Plumbers
- Plumbing Services, MA
- Residential Plumbing Services, MA
- Sewer Camera Inspection
- Sewer Line Repair, MA
- Sewer Repair
- Sewer Repair
- Sump Pump Installation, MA
- Sump Pump Repair, MA
- Sump Pumps
- Tankless Water Heater Installation, MA
- Tankless Water Heaters
- Tankless Water Heaters
- Water Filtration
- Water Heater Installation, MA
- Water Heaters
- Back
- Plumber
- Back
- AC Installation, MA
- Air Conditioning
- Carpentry And Remodeling
- Commercial Plumbing Services, MA
- Cooling
- Emergency Plumbing Services, MA
- Furnaces
- HVAC Repair, MA
- Handyman
- Heating
- Leak Detection, MA
- Plumber
- Plumbers
- Plumbing Services, MA
- Residential Plumbing Services, MA
- Tankless Water Heater Installation, MA
- Tankless Water Heaters
- Water Heater Installation, MA
- Water Heaters